Tuesday, December 4, 2012

Dresser to Entertainment Console

Follow Me on Pinterest

Three things happen to me when I get an idea for a project.  
  1. I get consumed by it
  2. I am frugal.  
  3. I get bored easily.
With those three things in mind, let me tell you about my latest project.  The mission that has consumed me the last few weeks/months has been to locate a bedroom dresser to upcycle into an entertainment console for the family room.  

Consumed Part - 
I scoured Pinterest for ideas on what I wanted it to look like.  I searched Craigslist daily, to no avail, looking for just the right dresser.  I even contemplated breaking into my sister's house and stealing the dresser out of her master bedroom.  I kind of considered using the one in my daughter's childhood bedroom, but quickly ruled that one out.  That set I'm saving for another project someday.

Then one day, it happened.  I found it.  The dresser I was going to give a makeover, too.  Whew!  The guilt I was feeling over wasting so much time on the "hunt" was overI found the dresser on a local site.  It was well made, priced inexpensively and it came with a bonus end table that the seller threw in for free.  Two pieces for the price of practically nothin'!  

Here's the dresser before.
  

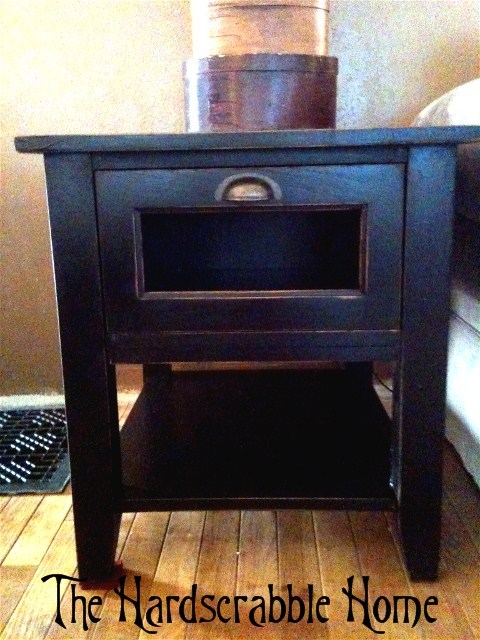
Here is the free end table before:

I love the cup pull on the end table and I was actually going to use that style on the dresser, so it was a bonus that the table already had it!

We went to work removing the old handles from the dresser, puttying the holes and sanding both pieces.

Look at the dresser in this next picture.  See the curved bottom of it?  Well, that was too bedroom furniturey looking to me.  We covered that up by wrapping the bottom 4" with a piece of pretty trim.  You'd swear the new piece had been there it's whole lifetime.  
FRUGAL PART
The top three drawers of the dresser came out to make room for a shelf.  We were able to use a piece of scrap wood that we had cut to size.  Cost - $0.  Love that!  

Once everything was sanded and the putty dry, we used some satin black paint we had on hand (doesn't everyone have a paint stash?)  and got busy painting.  Notice anything about the picture below?  The "oops" is that we painted one of the top row drawers (which were smaller) instead of the two middle small drawers.  We caught the mistake and quickly painted the right sized one before we got too far in the process.  We drilled holes for the cords in the back of the dresser.

    
After they dried, we sanded the edges and gave them a distressed look.  Once that was completed, we vacuumed them really good and used a tack cloth to get all traces of dust off of them.  Following that, we stained them with an Antique Oak gel stain.  

Frugal Part Again -
Here they are drying and waiting for their new drawer pulls to be attached.  I found the oil rubbed bronze drawer pulls for the dresser on Ebay.  I've had great luck in the past with cabinet knobs and drawer pulls on Ebay.  I bought 8 of them and they cost less than $20 delivered right to my door.  It would have cost a lot more had I bought them at a home improvement store.  

Bored Part - 
After the stain had dried, I applied a coat of furniture wax to both pieces.  What a pain in the patootie that was!!  Ugh.  I really went about this the wrong way.  I applied the wax to both pieces, covering every little section of both.  I waited for them to dry.  Then I went to town removing the wax.  I was so excited to get it done.  That excitement didn't last long.  I'd say a half hour into removing wax I realized that this was going to take me FOREVER.  I'd remove a little wax, then walk away and do something else.  Remove a little more wax, then walk away and do something else.  So on and so forth.  As the sun started to set, I realized that the longer I procrastinated the harder the wax was drying and I was only causing more pain and arm torture for myself by not sticking to the task.  I pushed through.  I even got out toothpicks and tried to get all of the wax out of the grooves of both pieces.  Tried being the operative word.  The toothpicks were cheap toothpicks and kept breaking.   That's ok.  One day when I'm bored working on some other half finished project, I'll tackle that wax with better toothpicks.  

Finally, FINALLY, both pieces were finished!!!  Want to see them?*  Here they are!  (The glass piece for the end table isn't installed yet as you can see in the picture.)

There you have it.  Let me tell you!  It looks rockin' good with our circa 2005 GINORMOUS TV on it.  My Best Buy Salesman son cringes when he comes home to visit.  "You really need a new TV Mom!"  I'd show a picture of it with my retro TV, but don't want to cause anybody to regret their own choice of having a new fangled flat screen.  (Big TV's WILL be back!  Mark my words!)  Anyway, I snapped the pics above when I was home alone and there was NO WAY I could move that monster of a TV by myself.  

The only drawback to this wonderful makeover project is that I have to dust every single day now.  Black furniture shows dust.  Oh, well.   It's still worth it.  I am in love with both pieces.  

*Please pretend you didn't notice that my family room is lacking wall trim.  If you are lucky enough to own an old house, (mine is 100+ years old) then you know that an old house is never finished.  There are always projects to be done.  Which is exactly why there is a magazine called "This Old House" (to which I am a subscriber) and a TV show of the same name.  (You should get that magazine.  It's the only one I make time to read.)  

What's next on the project list?  Well, I started stripping my hutch and buffet of a finish my grandma put on it 40+ years ago.  It's been my dining room set for 25 years.  The best/worst part is I started stripping it the WEEK OF THANKSGIVINGI know!!  What was I thinking?  I wasn't!  I stopped working on it to concentrate on turkey day and because I became bored scraping all that gunk off of it.  It'll be done someday soon.  I think.  When it is finished I'll show it to you.  That project is costing me nothing but time and $12 for a bottle of Citristrip.  Everything else is free to completely make it over.

Stay tuned...OH WAIT!  I almost forgot!  The top mirrored hutch part of the dresser.  Remember that?  Well, I've been looking for ways to repurpose that, tooSo far I've seen them turned into puppet theaters and mirrored hanging bar shelves.  Neither of those ideas appeal to me.  If you have any suggestions for ways to repurpose it, let me know.   Pin It

Tuesday, October 30, 2012

Mickey Mouse and Me

Follow Me on Pinterest
There is something you should know about me.  I am more of a Looney Tunes girl than a Mickey Mouse one.  Yep, I am.  I'll take Wile E. Coyote and the Road Runner over Mickey any day of the week.  Anvils, beep beep, desert dust...the whole shebang.  Love them.  That being said, nobody I know is dressing up as the Road Runner or Wile E. Coyote for Halloween this year.  Not a single little person.  Strange.  

Anyway, this isn't about the Looney Tunes.  Nope, this is all about Mickey Mouse.  This will make my "loves everything Disney" grown niece Tara very happy.  

I know a little person that is going to be Mickey Mouse.  His mother was having a hard time finding the costume in our local stores.  So, I volunteered my services to make it.  How hard can it be?  Not hard at all!

Felt was my fabric of choice for most of it.  It's cheap and easily attainable.  Unless you live in my town.  Then, forget it.  You may find, MAY FIND, two pieces of the color you need.  The rest of it you'll have to travel at least 20 minutes to purchase.

The gloves were the easiestI found a Mickey Mouse glove pattern and traced it onto two stacked pieces of white felt.  I sewed on my tracing lines then cut the glove out.  
You could faintly see the pencil line, but I just turned it over and that's the back side of the glove.  I cut out three little black marks out of felt and hot glued them to the gloves.  I did this for both gloves.  Flipping the pattern of course, so you have a left hand and right hand glove.  There they are, all finished!  Yes, Mickey has four fingers or three fingers and a thumb.  Do real mice have four fingers?  I don't know.  If I see a real mouse I will scream for my husband and then jump on a chair.  (Mental note:  Google "do mice have four fingers?"  Are they even called fingers?  I'll Google that, too. )
Next I worked on his shorts.  This was super easy!  I cut out two little circles and sewed them onto a pair of red shorts.  As seen below.
Then, I added a tail by cutting a strip of black felt, which I folded over and hot glued, then stitched onto the back of the shorts.  The tail is SO CUTE!
The shoe covers were the thorn in my side.  I saw some really cute ones out there and became completely jealous of the talented seamstresses that made them.  I am not of their caliber.  AT ALL.  I made a sample one out of green felt so as to not screw up the little bit of yellow felt I had.  The green one turned out ok, so I made two out of yellow.  I made it with four pieces.  It just slips over his regular shoes.  The top piece that covers the toe area is two pieces that I stuffed with some poly-fill.  Then I used two more pieces that are sewn to the top piece and wrap around the back of his shoe.  I added a piece of elastic that runs underneath his shoe to hold it in place. 
The ears were the easiest of all.  I was prepared to make the ears out of a headband and some black felt.  But, his Mom found some cute cat ears that looked close enough to be Mickey's ears.  All I had to do to them was trim some fur around the ears and cover the pink part of the ears with black felt, which I glued onto it.  He is going to wear the ears backwards so you won't really see the felt that I used.   I don't have a close-up of the ears.  But, below is the whole costume and you can see the ears there.  
All his mother has to do is paint his nose black, add some black tights and a black turtleneck.  Transformation complete.  He is MICKEY MOUSE.  Hand that kid a plastic pumpkin and send him on his way.  (Not really, they will accompany him while he trick or treats.) 

Now its time to say goodbye to all our company. 
M-I-C, see you real soon!
K-E-Y, why? because we like you! M-O-U-S-E. 


Happy Halloween Mouseketeers!   


Pin It

Monday, October 29, 2012

High Chair Re-Do

Follow Me on Pinterest
I am always looking for a project to do or re-do.  ALWAYS.  Remember the pickle jar lamp?  Or the apron from a pair of blue jeans?  

Well, today it's a high chair.  

This high chair belonged to my youngest son.  Here he is in it at his first birthday sticking his finger in his Winnie The Pooh cake I made for him.  (Note: I was smart and took his shirt off.  Frosting, you know?)
I love that high chair.  It is sturdy and easy to operate.  One handed even!  I haven't found a single one today that compares to it.  Now, my little baby up there in that photo is now 11.  However, I frequently have visitors with little kids so I kept the chair and it does get used.  This is what the chair looked like originally

When it was newer I was able to buy replacement chair pads from Graco for $17.  Not so anymore.  Graco doesn't offer them for this model because they WANT YOU TO SPEND $100+ FOR THE LATEST MODEL.  Not gonna happen.  The last few years I've had to make my own chair pad.  I head to Hobby Lobby and purchase the black and white checker board vinyl fabric.  I love the designIt costs about $5 a yard.  They do have other choices of vinyl fabric but we are partial to checkered flags.  The first year I made one I purchased foam for the cushion.  I reuse the same foam over and over.  
I made a pattern by tracing the old one onto brown kraft paper and every year or so, I'll make a new seat cover.
After tracing, and cutting, I sew.  
Then stuff with the foam and a little added polyfill.  Stitch it closed.  In the case of my chair, the seat flaps slip over tabs in the back and underside of the chair, so I cut slits into them to keep them in place.

Normally, this would be it.  I would call it complete.  A black and white checker board cover on the original white high chair.  

Not this time.

This time, I took it a step further and gave the entire chair a makeover by using Rust-Oleum's Paint Plus 2X Ultra Cover spray paint in black semi-gloss.  It bonds to plastic.  I love the stuff.  Before I began I called the company and not just one, but two employees assured me that once the chair cures for 7-10 days, it will be perfectly safe to serve food off of the tray.  If you do this to a high chair, call the company of whatever paint you choose to use.  It might vary depending on the paint brand/company.

Here's the tray before it was painted...
 
...and here is the complete chair all finished.
Isn't it cool?  It looks better than brand new.  I'm so glad I took the extra steps and went with the black spray paint.  I used just a little over two cans of paint on this.  

My kitchen cabinets I had painted black a few years ago so it really compliments the kitchen now.  This re-do makes me want to go house to house making over people's high chairs.  
Pin It

Friday, October 26, 2012

Going Batty

Follow Me on Pinterest
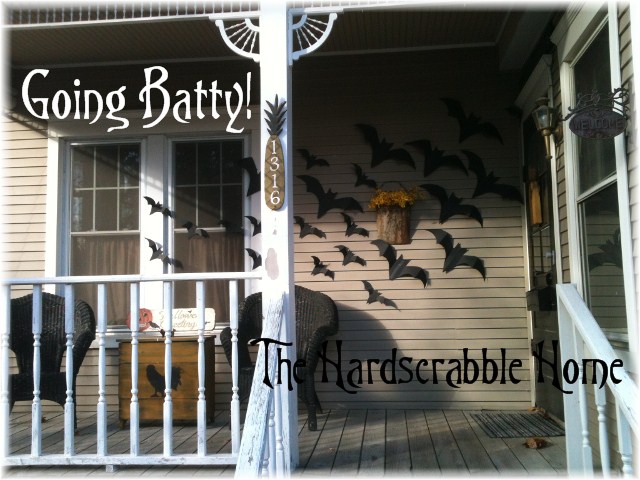
Halloween is fast approaching and until yesterday our poor little Hardscrabble Home was sorely lacking in outside decor.  I had one Halloween sign on the front porch and that was pretty much it.  Unless, you count the numerous cobwebs out there.  Real ones, too, thank you very much!  We are authentic if nothing else. 

Well, yesterday I found myself looking for inspiration on the world wide web.  (Does anyone call it that anymore?) That's when I stumbled onto the bats on the front porch crazeMartha Stewart has her bats hanging on the porch.  


It looked simple enough to do.  So, my friend and I headed to the closest store for the supplies to get busy.  In our case the closest store on our side of town is Walgreens.  Luckily, they had everything we needed to start our project.  Plus, we ran into a few other friends while there, which was a bonus.  Except, they were there for the drugs and not the art supplies.  You gotta love cold and flu season. 


We bought four sheets of black poster board and a package of two sided tape squares.  We had already printed off the pattern from Martha's website before we left home.  Here's where you go for Martha's Bat Pattern. Once we returned we started tracing the bats onto the paper.  We did two sizes.  At this point, my friend deserted me and went home.  I continued for a little while longer.  Just a little though because dinner had to be cooked and Grey's Anatomy was coming on at 8pm.

I finished tracing and cutting out the little creatures this morning.  Ignore the large one on the wall that is taped in the center.  I'm not sure what happened to him.  I'm sure my mail lady won't mind that he is pieced back together.  She is the only one who ever uses the front porch. 
Halloween At The Hardscrabble Home
Pretty neat looking, huh?  You should totally do this to your front porch, too Pin It

Thursday, October 4, 2012

Autumn Pumpkin Roll

Follow Me on Pinterest
It's Autumn!  You know what THAT means Time to stock up on pumpkin before it's gone until next year.  If I was as domestic as my friend Brigette, I'd use pumpkin from an actual pumpkin and not from a can.  Someday I will, just not today.

In celebration of this wonderful season we are going to make a pumpkin roll.  Not just any old pumpkin roll, but an Autumn Pumpkin Roll.  (There's really no difference I just felt like dressing up the name a bit.)  

When I was planning on what to bake today involving pumpkin my first thought was to make my recipe for "Great Pumpkin Dessert".  Alas, I did not have all the ingredients for that.  I skimmed through the ingredients I did have on hand, and settled on a pumpkin roll.  

I'll let you in on a little secret first, after I started making this recipe I realized I was short on sugar.  I considered calling my neighbor and asking to borrow a 1/2 cup of sugar, but thought that would be so cliche.  Instead, I used 1/2 cup of regular sugar and a 1/2 cup of brown sugar.  It didn't hurt the recipe or it's outcome one bit.  Still tastes delicious.  It's nice to know that you can swap one ingredient with another and still have yummy results. 

Now, let's gather those ingredients, shall we?
Grab 1 cup of sugar, 2/3 cup of pumpkin, 1 tsp. lemon juice, 3/4 cup of all purpose flour, 1/2 tsp. vanilla extract, 2 tsp. pumpkin pie spice, 1 tsp. baking powder, 1/2 tsp.  salt, 1 1/4 cup of powdered sugar, 1 8 oz. cream cheese, 1/2 cup butter and 3 eggs. 

Beat eggs at high speed for five minutes.  Gradually add sugar, beating well.  Stir in pumpkin and lemon juice.  Combine flour, pumpkin pie spice, baking powder and salt.  Stir dry ingredients into pumpkin mixture, combining well.  Spoon batter into a greased and floured 10 x 15 x 1 inch jelly roll pan, spreading evenly over bottom.  Bake at 375 degrees for 15 minutes.
 There is mine ^ all baked and ready to flip onto it's powdered sugar towel.  That's the next step.  Use a clean kitchen towel sprinkled with 1/4 cup of powdered sugar to turn your cake onto after baking.  I prefer using a cut piece of ticking fabric.  Roll up the towel/cake in a jelly roll style, starting at the smaller end.  Cool.
While your cake ^ is cooling, prepare your cream cheese filling.  Combine 1 cup powdered sugar, cream cheese, butter and vanilla.  Beat until smooth and creamy. 
After your cake has cooled, unroll and spread the cream cheese mixture, covering cake completely.  I like to use my angled cake spatula for this step.  It's great for frosting cakes, too 

Now, it's time to roll your pumpkin roll up, this time WITHOUT the towel.  I've heard of people who roll it up with the towel and wonder what they did wrong.  Can you imagine? 

Chill your pumpkin roll in the refrigerator.  Then slice and serve.  Here's your finished pumpkin roll.
 Autumn Pumpkin Roll
by The Hardscrabble Home

3 eggs
1 c. sugar
2/3 cup pumpkin
1 tsp. lemon juice
3/4 cup all purpose flour
1/2 tsp. vanilla
1/2 tsp. salt
1 tsp. baking powder
2 tsp. pumpkin pie spice
1 1/4 cup powdered sugar, divided
1 8oz. cream cheese
1/2 cup butter

Beat eggs at high speed for five minutes.  Gradually add sugar, beating well.  Stir in pumpkin and lemon juice.  Combine flour, pumpkin pie spice, baking powder and salt.  Stir dry ingredients into pumpkin mixture, combining well.  Spoon batter into a greased and floured 10 x 15 x 1 inch jelly roll pan, spreading evenly over bottom.  Bake at 375 degrees for 15 minutes.

After baking, use a clean kitchen towel sprinkled with 1/4 cup of powdered sugar to turn your cake onto.  I prefer using a cut piece of ticking fabric.  Roll up the towel/cake in a jelly roll style, starting at the smaller end.  Let cool. 
  
While your cake is cooling, prepare your cream cheese filling.  Combine 1 cup powdered sugar, cream cheese, butter and vanilla.  Beat until smooth and creamy.  Unroll cooled cake and spread the cream cheese mixture on it, covering cake completely. Roll up your pumpkin roll, wrap in plastic wrap, chill and then serve.  


  Pin It