That's a weird title to a post about one of my all-time favorite cookies, isn't it? Allow me to explain...
As you know by now, I love to bake and usually do so once a week. For awhile I was on a Banana Bread kick. I'd bake bunches of it and give them away. I have a top secret for now banana bread recipe that is so good, but I don't eat the stuff myself. I'm a pusher, not a user except when it comes to cookies and those Dangerously Delicious Peaches and Cream Cheese Cookie Bars. Then I'm a user, too.
Which brings us back around to today's topic. A couple of years ago I was making a different cookie each week or so. Chocolate Chip, Snickerdoodle, Peanut Butter, and today's recipe Steffie's Peanut Butter Chocolate Chip cookie.
After weeks of baking every cookie recipe known to mankind, I ask my dear husband, "What's your favorite cookie?" I am fully expecting him to name something I've baked. Wouldn't you be, too? Well...
He replies, "Oreos."
WHAT!?!?! Did he just say OREOS??? OREOS?? Really?
I allowed my heart to resume to it's normal heartbeat before responding.
"So, YOU are a store bought cookie eater cheater, huh?", I say in the most accusatory tone that I can muster.
Had he been eating an Oreo at that moment, I think he would have choked on it from laughing. From there on, when it comes to cookies he has been known as The Store Bought Cookie Eater Cheater.*
Today's recipe isn't for a homemade version of Oreos, though I've seen them out there on the big World Wide Web. Rather, it is for Steffie's Peanut Butter Chocolate Chip cookies. These are D-E-L-I-C-I-O-U-S. Easy, too. Ready? Let's get baking...
I'm not going to bore you with pictures of the ingredients. There is nothing you don't already have in your cupboards in this recipe. Nor, am I going to insult your intelligence by posting step by step photos. There is nothing difficult about making these cookies. Plus, since Mother Robin tried to kill me last year by dive bombing me when I snapped a photo of the babies in her nest on MY FRONT PORCH, causing me to jump, scream, run and drop my camera resulting in its demise, well, the photos I get with my cell phone just aren't worth the time it takes to edit them enough to look decent. Plus, like I mentioned two sentences prior to my extremely long run on sentence, you are a smart person. You have probably made cookies successfully at some time in your life.
Steffie's Peanut Butter Chocolate Chip Cookies
The Hardscrabble Home
Ingredients
1/2 Cup Butter, Softened
1/2 Cup Peanut Butter, Chunky OR Smooth (It's your choice)
1/2 Cup Sugar
1/2 Cup Brown Sugar, Firmly Packed
1 Egg
1 1/4 Cup All Purpose Flour
1/2 tsp. Baking Powder
1/2 tsp. Baking Soda
1/4 tsp. Salt
1 Cup Semi-Sweet or Dark Chocolate Chips
Preheat oven to 375 degrees. Cream the butter, peanut butter and sugars together. Add the egg and mix until light & fluffy. Blend the flour, baking powder, baking soda and salt together well. Add the dry ingredients to the butter mixture, mixing well. Stir in chocolate chips. Drop cookies by tsp. onto non stick baking sheet. Bake for approximately 10 minutes. Allow to cool before removing.
Devour them with a glass of milk. Preferably in the middle of the night because between midnight and 6am, calories don't count. (Don't quote me on that.)
*Back to the * I placed earlier in a sentence about the Store Bought Cookie Eater Cheater. The way you break your husband from carrying on with a store bought cookie is to buy him his Oreos. Make them the Double Stuffed ones, too. Always repackage them into a plastic lidded container "to keep them fresh". After awhile of supporting his habit with the real stuff, the NAME BRAND stuff, switch it out with the generic ones. They are NOT AS GOOD. He won't notice they aren't real Oreos. Before you know it, the day will come when you are preparing the grocery list. You'll say, "Honey, do you want me to pick up some Oreos?" He'll reply no, because he has lost his taste for them. hehehe. You have just won your battle and now YOUR homemade cookies reign supreme once again.
Enjoy your cookies! I always double the recipe above when I make them. I could have listed those measurements but I didn't want to seem like the gluttonous pig we revealed ourselves to be last week with the cookie bar recipe.
Pin It
Tuesday, February 12, 2013
Tuesday, February 5, 2013
Drunken Whiskey Meatballs
For those of you who have been here before, you'll recognize this recipe from a couple of months ago. Weird that it popped up on top of the blog today. I must have hit something I wasn't supposed to hit. Oh, well. If you've seen this recipe before on here, then skip on down the page and check out the latest one. The Peaches & Cream Cheese Cookie Bar recipe. If you haven't seen this meatball recipe before, then read it, make it and let us hear about it!
Drunken Whiskey Meatballs.
Sounds good? Doesn't it? Woo hoo!! It's a crockpot recipe, too!!
Let's gather together the ingredients, shall we?
You will need meatballs, (make it easy on yourself for this recipe, buy the frozen ones. You can still tell them you made them from scratch, they won't check out your story. If they do, then ask yourself, "What is WRONG with that person?") Ketchup or Catsup, Canadian Club Whisky* (look at that bottle - I DID NOT spell Whiskey wrong. Okay, you can't tell from the picture but that's how they spell it on the bottle), worcestershire sauce, lemon juice and brown sugar. *Really, you can use any brand of whiskey you want, I don't even live in Canada.
Throw your meatballs into your crockpot. I used the large 32 oz. bag of meatballs. In a small mixing bowl, mix together 1 cup of ketchup, 1 cup of brown sugar, 1/2 cup of Canadian Club Whisky, (plus pour a shot for your Diet Coke), 2 t. lemon juice, and 2 teaspoons of worcestershire sauce. Pour that over your meatballs and stir until all of them are coated. Turn your crockpot on high or low, depending on how much you procrastinated before starting this recipe. I made this about two hours before we were to eat, so I cranked her up and kept her on high the whole time.
Here they are getting ready to crockpot away.
Keep an eye on your meatballs while they are cooking, stirring occasionally so you don't burn your sauce. That is it. Simple, fast to make and it tastes delicious.
When they are finished they should look like this.
Drunken Whiskey Meatballs
by The Hardscrabble Home
1 32 oz. bag of frozen meatballs
1 cup of ketchup
1 cup of brown sugar
1/2 cup of Canadian Club Whisky
2 tsp. of lemon juice
2 tsp. of worcestershire sauce
1 crockpot
Place frozen meatballs in crockpot. Mix remaining ingredients together and pour over meatballs. Stir until completely covered. Turn on high and cook for about two hours, stirring occasionally. Or, you can cook on low for a longer period of time.
I think you should make them and take them to a party. Then you can relax, enjoy the compliments on how good they are, and if you are lucky the hostess will wash the crockpot for you before you leave. Pin It
Drunken Whiskey Meatballs.
Sounds good? Doesn't it? Woo hoo!! It's a crockpot recipe, too!!
Let's gather together the ingredients, shall we?
You will need meatballs, (make it easy on yourself for this recipe, buy the frozen ones. You can still tell them you made them from scratch, they won't check out your story. If they do, then ask yourself, "What is WRONG with that person?") Ketchup or Catsup, Canadian Club Whisky* (look at that bottle - I DID NOT spell Whiskey wrong. Okay, you can't tell from the picture but that's how they spell it on the bottle), worcestershire sauce, lemon juice and brown sugar. *Really, you can use any brand of whiskey you want, I don't even live in Canada.
Throw your meatballs into your crockpot. I used the large 32 oz. bag of meatballs. In a small mixing bowl, mix together 1 cup of ketchup, 1 cup of brown sugar, 1/2 cup of Canadian Club Whisky, (plus pour a shot for your Diet Coke), 2 t. lemon juice, and 2 teaspoons of worcestershire sauce. Pour that over your meatballs and stir until all of them are coated. Turn your crockpot on high or low, depending on how much you procrastinated before starting this recipe. I made this about two hours before we were to eat, so I cranked her up and kept her on high the whole time.
Here they are getting ready to crockpot away.
Keep an eye on your meatballs while they are cooking, stirring occasionally so you don't burn your sauce. That is it. Simple, fast to make and it tastes delicious.
When they are finished they should look like this.
by The Hardscrabble Home
1 32 oz. bag of frozen meatballs
1 cup of ketchup
1 cup of brown sugar
1/2 cup of Canadian Club Whisky
2 tsp. of lemon juice
2 tsp. of worcestershire sauce
1 crockpot
Place frozen meatballs in crockpot. Mix remaining ingredients together and pour over meatballs. Stir until completely covered. Turn on high and cook for about two hours, stirring occasionally. Or, you can cook on low for a longer period of time.
I think you should make them and take them to a party. Then you can relax, enjoy the compliments on how good they are, and if you are lucky the hostess will wash the crockpot for you before you leave. Pin It
Dangerously Delicious Peaches & Cream Cheese Cookie Bars
I love to bake. I have been baking since I was a young girl. Birthday cakes, cookies, you name it. Some of the goodies that stand out in my memory include:
The white double layer birthday cake I made in 1976 for our Dad's 36th birthday. I put the candles on it and one of my sister's lit them. The four of us kids pulled him into the kitchen and sang "Happy Birthday" to him. Then Dad, always trying to be the fun parent, promptly cut the cake into five equal pieces and we ate it for dinner. For the record, our Mom is equally fun but she never let us eat a whole cake for dinner.
This picture isn't from 1976, but it is me and Dad on his 28th birthday. Mom made that cake. Note that the six of us that day only consumed half of the cake. Mom had the portion control in check.
Moving onto another standout moment in my baking history. This time it was a double chocolate cake. It was gorgeous, too. It was in 1982 and I was a teenager. My beautiful and delicious cake was in the refrigerator. My boyfriend Troy came over with our friend Dave. He opened up the fridge, spotted the cake, called out, "Dave, look! CAKE!!". Then promptly stuck his finger into the middle of my beautifully decorated and untouched cake. Troy is now my wonderful husband. Each time I bake a cake I remind him of that time.
Moving ahead to 2007. My youngest son Matthew is about ready to turn 6. I ask him, "What kind of birthday cake do you want Mommy to make you?" I am expecting to hear Spiderman, Batman or some other boy type of cake. I wasn't expecting the following out of him. This is what he said:
Matthew: "I want a cake with President Bush's face on it. I want "Hail to the Chief" playing and I want to hand out flags to everyone at my party."
Hhmmm. So, we did. I made a cake with President Bush's face on it. We played "Hail to the Chief". He handed out flags AND they colored pictures of the President. It was a fun party! My very own little Alex P. Keaton.
My very much a Democrat father refused a piece of cake. He did take a flag and we sent him home with a wooden Democratic Donkey folk art piece. That was his reward for biting his tongue throughout the whole party. After all, Matthew's middle name is David, which was Dad's first name. He indulged his namesake as long as he could but drew the line at eating the cake.
Here is a picture of the cake. It was my first and last attempt at putting a face of someone on a cake. Barbara Bush liked it!! We sent her a letter and pictures of her son's face on my son's 6th birthday cake. We sent her the letter AFTER we had sent them to the White House and received no response. I KNEW that SHE being a mother would respond and she did. She replied with two very sweet letters to me and Matthew.
Please remember Matthew in the future when he runs for President. He would appreciate your vote.
Now, let's travel to 2013. It's last week and I was trying to figure out what to bake. I knew I had some store bought sugar cookie dough in the fridge to use up. (I know! Store bought! That's not like me, but I only buy it at Christmas to make Matthew's Mint Surprise Cookies which I never did make at Christmas.) I also had cream cheese on hand and some peaches.
I had bought the peaches thinking I would make Peaches & Cream Cheese Cake, but instead decided to adapt that recipe to a cookie bar instead. BIG MISTAKE!!! Not really. It was delicious. DANGEROUSLY DELICIOUS as the title of this post says. Dangerously delicious because I had counted on this wonderful treat to last us more than just TWO DAYS!! Yep, we devoured them in 2 days. We hang our heads in shame.
Here's what you need to gather together to make this recipe: one super large roll of sugar cookie dough (or two regular sized ones), one 8 oz. bar of cream cheese, one egg, two cans of 15.25 oz peaches, 1/3 cup sugar, plus cinnamon and more sugar mixed.
Take your standard size cookie sheet and roll or pat out 2/3 of the sugar cookie dough to form a crust covering the entire pan. Bake at 350 degrees for 10 minutes. Remove from oven.
In a medium sized bowl, mix together softened cream cheese, 1/3 cup sugar and 1 egg. Mix until combined.
Drain peach slices and cut them into bite size pieces. You won't need the juice.
In a small bowl, mix together sugar and cinnamon. I just throw that part together. I don't measure. You can also buy the sugar and cinnamon already mixed but really, why would you?
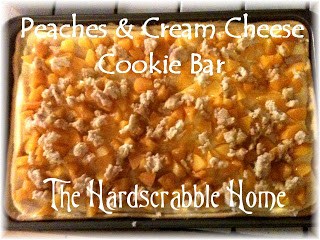
Take your crust and spread your cream cheese mixture over the top. I like to use my angled icing spatula for this part. Now arrange your peaches over the top of the cream cheese layer. Once that is done, take little pieces of your remaining sugar cookie dough and drop them sporadically over the peaches. It won't cover it completely. Finally, sprinkle cinnamon & sugar over the entire top. Here it is before baking.
Pop it back into your 350 degree oven for 30 minutes. Here it is after baking.
Let it cool completely, then cut into squares and store in refrigerator. I made another batch last night which is when I snapped these wonderfully professional looking photos with my phone. I threw half of this batch into the freezer. I know! I could hardly keep from laughing when I typed that. How long do YOU think they'll last in there? Yep. Me, too. Barely long enough to freeze thoroughly. (If I'm being honest, and I am always honest, I actually took one out of the freezer container last night so my husband wouldn't look at the container in the fridge and ask, "Who is eating all of these?" Don't tell him, ok?)
1 Large or 2 Regular Sized Rolls of Sugar Cookie Dough
1 (8 oz.) Cream Cheese, Softened
1 Egg
1/3 Cup Sugar
2 (15.25 oz.) Cans Peach Slices, Drained
Cinnamon & Sugar Mixture
Preheat oven to 350 degrees. Roll 2/3 of dough out as crust on a cookie sheet. Bake for 10 minutes.
In a medium size bowl, mix together cream cheese, 1/3 cup sugar and 1 egg until blended thoroughly. Spread over baked crust. Dice peaches and arrange over cream cheese mixture. Drop blobs of remaining cookie dough over peaches. Sprinkle cinnamon & sugar mixture over entire cookie sheet. Return to 350 degree oven and bake for 30 minutes. Let cool, cut into slices and store in refrigerator.
While cookies are cooling, go through cookbooks and figure out what you will bake in two days when these are all gone.
Pin It
The white double layer birthday cake I made in 1976 for our Dad's 36th birthday. I put the candles on it and one of my sister's lit them. The four of us kids pulled him into the kitchen and sang "Happy Birthday" to him. Then Dad, always trying to be the fun parent, promptly cut the cake into five equal pieces and we ate it for dinner. For the record, our Mom is equally fun but she never let us eat a whole cake for dinner.
This picture isn't from 1976, but it is me and Dad on his 28th birthday. Mom made that cake. Note that the six of us that day only consumed half of the cake. Mom had the portion control in check.
Moving onto another standout moment in my baking history. This time it was a double chocolate cake. It was gorgeous, too. It was in 1982 and I was a teenager. My beautiful and delicious cake was in the refrigerator. My boyfriend Troy came over with our friend Dave. He opened up the fridge, spotted the cake, called out, "Dave, look! CAKE!!". Then promptly stuck his finger into the middle of my beautifully decorated and untouched cake. Troy is now my wonderful husband. Each time I bake a cake I remind him of that time.
Moving ahead to 2007. My youngest son Matthew is about ready to turn 6. I ask him, "What kind of birthday cake do you want Mommy to make you?" I am expecting to hear Spiderman, Batman or some other boy type of cake. I wasn't expecting the following out of him. This is what he said:
Matthew: "I want a cake with President Bush's face on it. I want "Hail to the Chief" playing and I want to hand out flags to everyone at my party."
Hhmmm. So, we did. I made a cake with President Bush's face on it. We played "Hail to the Chief". He handed out flags AND they colored pictures of the President. It was a fun party! My very own little Alex P. Keaton.
My very much a Democrat father refused a piece of cake. He did take a flag and we sent him home with a wooden Democratic Donkey folk art piece. That was his reward for biting his tongue throughout the whole party. After all, Matthew's middle name is David, which was Dad's first name. He indulged his namesake as long as he could but drew the line at eating the cake.
Here is a picture of the cake. It was my first and last attempt at putting a face of someone on a cake. Barbara Bush liked it!! We sent her a letter and pictures of her son's face on my son's 6th birthday cake. We sent her the letter AFTER we had sent them to the White House and received no response. I KNEW that SHE being a mother would respond and she did. She replied with two very sweet letters to me and Matthew.
Please remember Matthew in the future when he runs for President. He would appreciate your vote.
Now, let's travel to 2013. It's last week and I was trying to figure out what to bake. I knew I had some store bought sugar cookie dough in the fridge to use up. (I know! Store bought! That's not like me, but I only buy it at Christmas to make Matthew's Mint Surprise Cookies which I never did make at Christmas.) I also had cream cheese on hand and some peaches.
I had bought the peaches thinking I would make Peaches & Cream Cheese Cake, but instead decided to adapt that recipe to a cookie bar instead. BIG MISTAKE!!! Not really. It was delicious. DANGEROUSLY DELICIOUS as the title of this post says. Dangerously delicious because I had counted on this wonderful treat to last us more than just TWO DAYS!! Yep, we devoured them in 2 days. We hang our heads in shame.
Here's what you need to gather together to make this recipe: one super large roll of sugar cookie dough (or two regular sized ones), one 8 oz. bar of cream cheese, one egg, two cans of 15.25 oz peaches, 1/3 cup sugar, plus cinnamon and more sugar mixed.
Take your standard size cookie sheet and roll or pat out 2/3 of the sugar cookie dough to form a crust covering the entire pan. Bake at 350 degrees for 10 minutes. Remove from oven.
In a medium sized bowl, mix together softened cream cheese, 1/3 cup sugar and 1 egg. Mix until combined.
Drain peach slices and cut them into bite size pieces. You won't need the juice.
In a small bowl, mix together sugar and cinnamon. I just throw that part together. I don't measure. You can also buy the sugar and cinnamon already mixed but really, why would you?
Take your crust and spread your cream cheese mixture over the top. I like to use my angled icing spatula for this part. Now arrange your peaches over the top of the cream cheese layer. Once that is done, take little pieces of your remaining sugar cookie dough and drop them sporadically over the peaches. It won't cover it completely. Finally, sprinkle cinnamon & sugar over the entire top. Here it is before baking.
Pop it back into your 350 degree oven for 30 minutes. Here it is after baking.
Let it cool completely, then cut into squares and store in refrigerator. I made another batch last night which is when I snapped these wonderfully professional looking photos with my phone. I threw half of this batch into the freezer. I know! I could hardly keep from laughing when I typed that. How long do YOU think they'll last in there? Yep. Me, too. Barely long enough to freeze thoroughly. (If I'm being honest, and I am always honest, I actually took one out of the freezer container last night so my husband wouldn't look at the container in the fridge and ask, "Who is eating all of these?" Don't tell him, ok?)
There you go! Here's the recipe in it's entirety. I still haven't figured out the whole set it up so you can print it option on this blog. I hope you try this simple and delicious recipe. It makes a lot of servings so it would be perfect to take to a potluck or big gathering. Or you can just be pigs about it and let your own family eat it all in two days like mine did.
Peaches & Cream Cheese Cookie Bars
by The Hardscrabble Home
1 Large or 2 Regular Sized Rolls of Sugar Cookie Dough
1 (8 oz.) Cream Cheese, Softened
1 Egg
1/3 Cup Sugar
2 (15.25 oz.) Cans Peach Slices, Drained
Cinnamon & Sugar Mixture
Preheat oven to 350 degrees. Roll 2/3 of dough out as crust on a cookie sheet. Bake for 10 minutes.
In a medium size bowl, mix together cream cheese, 1/3 cup sugar and 1 egg until blended thoroughly. Spread over baked crust. Dice peaches and arrange over cream cheese mixture. Drop blobs of remaining cookie dough over peaches. Sprinkle cinnamon & sugar mixture over entire cookie sheet. Return to 350 degree oven and bake for 30 minutes. Let cool, cut into slices and store in refrigerator.
While cookies are cooling, go through cookbooks and figure out what you will bake in two days when these are all gone.
Pin It
Tuesday, December 4, 2012
Dresser to Entertainment Console
Three things happen to me when I get an idea for a project.
- I get consumed by it.
- I am frugal.
- I get bored easily.
Consumed Part -
I scoured Pinterest for ideas on what I wanted it to look like. I searched Craigslist daily, to no avail, looking for just the right dresser. I even contemplated breaking into my sister's house and stealing the dresser out of her master bedroom. I kind of considered using the one in my daughter's childhood bedroom, but quickly ruled that one out. That set I'm saving for another project someday.
Then one day, it happened. I found it. The dresser I was going to give a makeover, too. Whew! The guilt I was feeling over wasting so much time on the "hunt" was over! I found the dresser on a local site. It was well made, priced inexpensively and it came with a bonus end table that the seller threw in for free. Two pieces for the price of practically nothin'!
Here's the dresser before.
Here is the free end table before:
I love the cup pull on the end table and I was actually going to use that style on the dresser, so it was a bonus that the table already had it!
We went to work removing the old handles from the dresser, puttying the holes and sanding both pieces.
Look at the dresser in this next picture. See the curved bottom of it? Well, that was too bedroom furniturey looking to me. We covered that up by wrapping the bottom 4" with a piece of pretty trim. You'd swear the new piece had been there it's whole lifetime.
FRUGAL PART -
The top three drawers of the dresser came out to make room for a shelf. We were able to use a piece of scrap wood that we had cut to size. Cost - $0. Love that!
Once everything was sanded and the putty dry, we used some satin black paint we had on hand (doesn't everyone have a paint stash?) and got busy painting. Notice anything about the picture below? The "oops" is that we painted one of the top row drawers (which were smaller) instead of the two middle small drawers. We caught the mistake and quickly painted the right sized one before we got too far in the process. We drilled holes for the cords in the back of the dresser.
Frugal Part Again -
Here they are drying and waiting for their new drawer pulls to be attached. I found the oil rubbed bronze drawer pulls for the dresser on Ebay. I've had great luck in the past with cabinet knobs and drawer pulls on Ebay. I bought 8 of them and they cost less than $20 delivered right to my door. It would have cost a lot more had I bought them at a home improvement store.
Bored Part -
After the stain had dried, I applied a coat of furniture wax to both pieces. What a pain in the patootie that was!! Ugh. I really went about this the wrong way. I applied the wax to both pieces, covering every little section of both. I waited for them to dry. Then I went to town removing the wax. I was so excited to get it done. That excitement didn't last long. I'd say a half hour into removing wax I realized that this was going to take me FOREVER. I'd remove a little wax, then walk away and do something else. Remove a little more wax, then walk away and do something else. So on and so forth. As the sun started to set, I realized that the longer I procrastinated the harder the wax was drying and I was only causing more pain and arm torture for myself by not sticking to the task. I pushed through. I even got out toothpicks and tried to get all of the wax out of the grooves of both pieces. Tried being the operative word. The toothpicks were cheap toothpicks and kept breaking. That's ok. One day when I'm bored working on some other half finished project, I'll tackle that wax with better toothpicks.
Finally, FINALLY, both pieces were finished!!! Want to see them?* Here they are! (The glass piece for the end table isn't installed yet as you can see in the picture.)
The only drawback to this wonderful makeover project is that I have to dust every single day now. Black furniture shows dust. Oh, well. It's still worth it. I am in love with both pieces.
*Please pretend you didn't notice that my family room is lacking wall trim. If you are lucky enough to own an old house, (mine is 100+ years old) then you know that an old house is never finished. There are always projects to be done. Which is exactly why there is a magazine called "This Old House" (to which I am a subscriber) and a TV show of the same name. (You should get that magazine. It's the only one I make time to read.)
What's next on the project list? Well, I started stripping my hutch and buffet of a finish my grandma put on it 40+ years ago. It's been my dining room set for 25 years. The best/worst part is I started stripping it the WEEK OF THANKSGIVING! I know!! What was I thinking? I wasn't! I stopped working on it to concentrate on turkey day and because I became bored scraping all that gunk off of it. It'll be done someday soon. I think. When it is finished I'll show it to you. That project is costing me nothing but time and $12 for a bottle of Citristrip. Everything else is free to completely make it over.
Stay tuned...OH WAIT! I almost forgot! The top mirrored hutch part of the dresser. Remember that? Well, I've been looking for ways to repurpose that, too! So far I've seen them turned into puppet theaters and mirrored hanging bar shelves. Neither of those ideas appeal to me. If you have any suggestions for ways to repurpose it, let me know. Pin It
Subscribe to:
Posts (Atom)